Go from Zero to Hero - learn Java from scratch or enhance your current skill set
For Absolute Beginners - learn SQL, JDBC, Java, Python, Webapps, AWS Cloud
click here for FREE tutorials
Playing around with our Main Class, create a simple server in both Java and Python
As seen in our previous tutorial we created a main class and printed Hello World to the java console. But most tutorials leave you hanging.
We will now do some things to our main class. Let’s create a related class and reuse its objects in our main class. First right click on our Test project SRC folder to create a new class
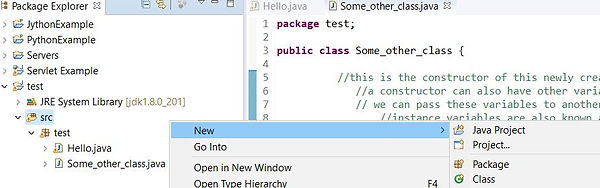
Then name the class and check Constructors from Super Class and press finish

The class appears in our workspace

At this point we can start editing the class. An easy way for now is to just select all the contents and delete and replace with the following code:
package test;
public class Some_other_class {
//this is the constructor of this newly created class
//a constructor can also have other variables within the parenthesis
// we can pass these variables to another class ( not covered here)
//instance variables are also known as arguments
public Some_other_class() {
System.out.println("This is a plain old java object");
} //end of constructor
} //end of class
Don’t forget to press file then save. We can now go back into the Hello class we created in the last tutorial, delete contents and replace with the following code:
package test;
public class Hello {
//this is the main method..we add comments with 2 slashes
public static void main(String[] args) {
//System.out.println("Hello World");
Some_other_class POJO = new Some_other_class();
// POJO is a new instance of the class called Some_other_class
// we declared a new instance of the related class
//POJO reuses some other classes objects and methods
//our main class has the main method but related class only needs a constructor
//note that there are other ways to do this ie inheritance (not covered here)
} //end of main method
} //end of class
Be sure to have both our classes open in our workspace. Press file save or file save all because we are working with two classes and have made changes in both.
I have added comments in each class file to guide us through the thought process. In short, we have a main class called Hello with a main method and we have another class called Some_other_class with a public constructor. The idea here is to run the main class and the contents of the related class will appear in our Java Console. Note that when working with plain java classes we must have a main method in the class we will be running in order to execute the program. So let’s run it now. Right click Hello.java, press run as and then java application

We will now see the contents of the related class show up in our java console

Now that we understand how to run two classes in the same package called test, I want to move on to creating a server from our main class and then later we will do the same in Python. In my last tutorial we created a Servlet class and ran it in a Tomcat Server so we could then go to our browser and display http://localhost:8080. But this previous tutorial required the installation of Tomcat in Eclipse. So this time around we will not be using Tomcat.
PS: our ultimate goal is to push all our work out to a web server so we can share it with an audience. For Java, within the Eclipse environment a Tomcat server is used frequently. For Python we use either Flask or Django to serve up our web pages.
Back in the old days we could serve up Java by using just a main class with a simple Jetty server. Here is how we do it. In this part of our lesson we will download a Java library and use it in our program. Go to the following link and download the Mortbay library.
http://www.java2s.com/Code/Jar/o/Downloadorgmortbayjetty517jar.htm

Be careful not to press the orange download button but rather down below click on the actual download link instead. Once downloaded we will see it in our downloads folder

We will unpack this zip file later and copy the jar file (java archive) to our new project. This jar file is also called a java library. So let’s first create a new project and call it Jetty Server. Select File then new then Java Project

Then we see the new java project form. Fill in the name as Jetty Server and press finish
Go back to project explorer where we will see our new project. Expand the sub folders and right click src then new class, fill in package as test2, fill in class name as JettyLauncher and check ONLY public static void main string args method below , then click finish

We will now see the JettyLauncher class in our workspace with only a main method

Select all the contents, delete and replace with the following code:
And don’t forget to press save
package test2;
//these following 2 imports will come from the jar file we downloaded
import org.mortbay.jetty.Server;
import org.mortbay.jetty.servlet.ServletHttpContext;
public class JettyLauncher
{
public static void main(String[] args) throws Exception
{
//We will create our server running at http://localhost:8070
Server server = new Server();
server.addListener(":8070");
ServletHttpContext context = (ServletHttpContext) server.getContext("/");
context.addServlet("/", "test2.HelloWorldServlet");
server.start();
} //end of main method
} //end of class
You will notice the red x marks to the left of some of our code. The reason for this is because we have not imported our library file into the project yet.

Go back to where we downloaded the mortbay jar file and extract the zip file, open the new folder and we will see the jar file needed in our program

Right click on the project name, choose properties then click on build path then libraries

Here we will press add external jars button so we can include our new jar file into the project. Navigate to where we stored the org.mortbay.jetty-5.1.7 jar file and press open and then press apply and close. The library is now part of our project and the red x marks disappeared.

While we are adding libraries we need two more. Since we are not using Tomcat for this application we need to extract the servlet-api.jar file from the Tomcat library location that we used in our last tutorial. Using the same process as above add external jar file into our build path by navigating to this path (note that rickd will not be in your path to tomcat lib)
C:\Users\rickd\Downloads\apache-tomcat-8.0.42\apache-tomcat-8.0.42\lib
Also we need a Commons jar file, download it from this link
https://commons.apache.org/proper/commons-logging/download_logging.cgi
And choose Binaries then this file commons-logging-1.2-bin.zip
After downloading the commons file, extract it and then add it to your build path like above.
I cannot stress the importance of these external library files enough. It is very crucial to understand how to include them in your project early on because we will encounter this many times and you cannot really become a java programmer without understanding this step.
Next step is to create another class called HelloWorldServlet and replace the existing code with the following:
/*
* for this application tomcat is not needed
*
* run this servlet from the Jetty Launcher main class as a java application
* then go to browser and type in http://localhost:8070/test2.HelloWorldServlet
* for output. The server is running on port 8070
*
* note: to run this again must restart eclipse otherwise error will show that port 8070 is already in use
*/
package test2;
import javax.servlet.*;
import javax.servlet.http.*;
import java.io.IOException;
import java.io.PrintWriter;
public class HelloWorldServlet extends HttpServlet {
public void service(HttpServletRequest request, HttpServletResponse response) throws ServletException, IOException {
// we will enter some code here and the run the servlet from the main class
//just do something simple like this
System.out.println("Hello World"); //this appears in console
PrintWriter out = response.getWriter();
out.println("<p>Hello World</p>"); //this appears on browser page
} //end of servlet service method
} //end of class
Save all and now your project looks like this

Now finally we are ready to run. Right click on JettyLauncher, then click run as then java application. Go to your browser and type http://localhost:8070/test2.HelloWorldServlet to see output.
Thanks for your patience thus far. This learning process can be slow and arduous but, take my word, it is well worth understanding how to program Java.
Now let’s create a basic server in Python. But as of now we are not set up in Eclipse to program Python so we will need to follow the same steps from our previous tutorial where we added the Java EE perspective in Eclipse. This time we need to add the PyDev perspective to Eclipse so we can program Python.
Download Python from this link
https://www.python.org/downloads/release/python-372/
and choose the windows executable option. Then after download double click on the exe file and install Python. Then go into Eclipse and press Help then install new software. At this point it is important to go to my previous tutorial and review the steps we took to install Java EE. In the work with box, insert http://pydev.org/updates and press enter. Then choose only the pydev option. Accept all defaults clicking next, then click finish and software will install, then restart eclipse. This next step configures python interpreter in eclipse. In eclipse go to windows then preferences and open pydev. Then open interpreter and choose python and then press browse for python...this will find python.exe....u might have a new button instead press this and do the same or choose config first in path if above does not work. Click apply and close...windows defender may show up.....click allow access. We should now be ready to use Python in Eclipse.
Now we need to create a new project. Be sure Eclipse is in the PyDev perspective. Click File, then new then PyDev Project and fill in the name as PythonExample and press finish. These are the same steps we did while creating a Java project. Then right click project name and select new then python module and name it test and it will auto save as test.py

Delete the code u see in the workspace and replace it with the following:
and don’t forget to file save
'''
Created on Mar 21, 2019
without index file httpd server just prints out a directory..otherwise contents of index is printed by default, httpd calls index.html if there is one, so be sure to also create index.html
HTTPd stands for Hypertext Transfer Protocol daemon (i.e. Web server)
Apache http server also uses same format with index.html in htdocs folder
after running this file go type localhost:8002 in your browser to see result
@author: rickd
'''
import http.server
import socketserver
PORT = 8003
Handler = http.server.SimpleHTTPRequestHandler
with socketserver.TCPServer(("", PORT), Handler) as httpd:
print("serving at port", PORT)
httpd.serve_forever()
#run this app and then go to localhost:8003 in browser to see result
#note if u try to run this again u will get error that port is in use
# so need to either use different port or stop server and restart server
Now right click on project again and choose new then File and name this file index.html
There will be no code. Copy and paste the following into the file and press save all
<html>
<head>
<title>Python is awesome!</title>
</head>
<body>
<h1>Hello World</h1>
<p>Congratulations! The HTTP Server is working!</p>
<p>watch for my new tutorials on both java and python</p>
</body>
</html>
Then Right click test.py, then run as Python run
Go to the browser to see output. As we can see it is much easier to create a simple server in Python than in Java but my opinion is that you should learn both and compare the two, especially in the beginning because Python takes so many shortcuts that u may not fully understand what u are doing. We will gain much more valuable knowledge by comparing the two languages. Notice no need to download and install libraries in Python. Very convenient. At some point later perhaps Python will become the preferred language but you will never regret knowing both especially as a beginner.
That's it for now. There is a lot of homework to be done researching many of the concepts I introduced. Be patient, it will all come together, but for now, it is not easy.